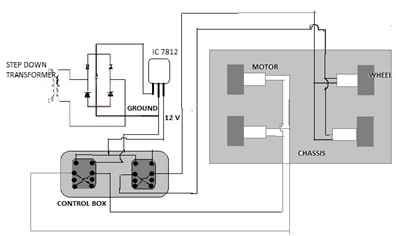
In the first issue of the new session, we dedicate a special section to all the new entrants into the robotics bandwagon as we race into what will be another glorious year of robotic achievement. The starting point is fairly basic : Build a manual robot which moves forward, backward, left and right according to your instruction. So, here’s what you need: Chassis : To use your base to make bots for manual robotics events later use 4 Wheels, 4 DC Motors, Wooden Base. If you just want a bot that can move around on plain ground, the quickest option is to break open two toy cars and use the motors along with the wheels attached)
Power Supply : Your motors need a 12 V DC supply to run. If you are into soldering circuits yourself, you might want to make your own rectifier circuit (think back to your XIIth standard Physics textbook-Bridge Rectifier). Add an IC 7812 across the rectified output to get a stable 12 V input into your motors. Or else, just get an adaptor which gives a 12V DC output or a set of batteries. Control Box : This puts you in complete control of the bot. You need two switches for two motors. Now you could choose to use two three-way switches with forward, backward and stop conditions for each motor or 2 two-way switches in combination with push button switches that control the On-Off condition. Usually, for an autonomous robot, the front wheels are replaced by a castor wheel while the two back wheels are connected to motors. Now that you know all the steps, follow the schematic for guidance and build yourself your first robot! To view a consolidated presentation on differential drive, click here
